Archives for category: art vocabulary

IMG_2599Here’s a quick little art experience you might like to try with your students that will help them explore the differences between positive and negative shapes and space.

All you need are 3 sheets of white paper per student — even copy paper will do — some small pieces of scratch paper, pencils, and cotton balls or tissue.

To begin, ask your students to cut a shape out of their first sheet of paper. Depending on the age and ability levels of your students, the shapes can range from simple, free-form organic shapes, to something much more complex. You will want to have them cut out their shape so that when they are finished, they are left with two things: the shape itself that they cut out, and the outside edge of paper around what they cut out.

Have them place the paper that they have left over from cutting out their shape, on top of their second piece of paper. (You might want to have them tape the top and bottom pieces of paper together to prevent movement.) Using a pencil, have them rub a patch of lead onto a piece of scratch paper. Using a cotton ball or a tissue, have them pick up some of that pencil lead and begin to rub it from the outside edge of the paper toward the center open space left by the shape they cut out.

IMG_2601

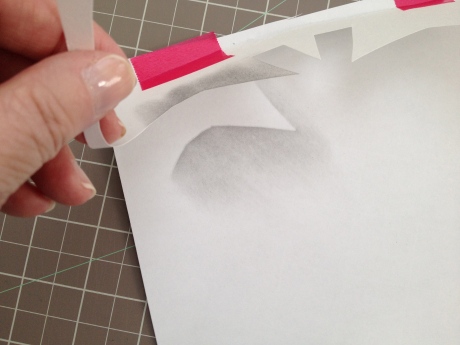
Continue this process of rubbing pencil lead from the outside edge in toward the center, until they have filled the center with pencil shading. Carefully separate the two sheets of paper. What they are left with is a shaded image of their shape. This shaded shape is the “positive” image. If you were to peek under an edge while they worked, it would look like this:

IMG_2602

Next, ask your students to carefully position the actual shape they cut out on top of their third sheet of paper. (You might consider having your students place one or two tape loops underneath their shape to keep it from moving around.) Using the same pencil lead and cotton ball or tissue, this time you are going to ask your students to rub from the shape itself onto the paper below.

IMG_2603

Have them continue rubbing from their shape onto the paper underneath it until they have rubbed all the way around. Ask them to carefully separate the two pieces of paper, set their actual cut out shape aside, and what they will be left with is an image of their shape determined by the shading around the outside of it. This is the “negative” image of their shape. If you were to peek underneath their shape while they were working, it would look like this:

IMG_2604

Try this yourself first so you can see how easy and fun it is to do. Kids are always delighted by this experience because the results seem so magical!

Looking for more art lessons like this one to incorporate into your classroom curriculum? Check out my affordable, convenient, and self-paced Professional Development course offerings through Fresno Pacific University here. This particular lesson is part of my class called Drawing Magic.

IMG_2355With the holiday season upon us, what better way to decorate your classroom, or another location at school, than by having your students make some festive, one-of-a-kind holiday streamers?! This idea can be used at any grade level, and materials can be as simple or as complex as you’d like them to be.

MATERIALS: You will pre-cut one long, thin strip of butcher paper for each child in your class, plus a few extras in case of any “disasters”. 🙂  A good size for these strips would be about 6 inches wide by about 5 or 6 feet long. Decide what materials you’d like them to use to decorate their banners. Depending on your time frame, the age and skill levels of your students, and how involved you want to get, materials can range from crayons only to things like, construction paper and glue, cotton, buttons, brads, tissue paper, and more. You might consider limiting their color choices, so that all designs will be created using red, green, and black for example.

MOTIVATION: Before distributing the banners and supplies, tell your students that they are each going to decorate their paper strip with a vertical (tall) design. This means that they will work from top to bottom and not from left to right as they usually do. Talk about all the possibilities for holiday images including things like designs, lettering, and symbols. Time spent brainstorming before you distribute supplies will pay off greatly once everyone gets to work. In fact, you might consider making a list of things during brainstorming, so that students have something to return to if they feel stuck. (Great language arts connection opportunity, too!) Be sure to stress that the decorations for these streamers need not only be “representational” art. (Art that looks like something.) Images of pure design (nonrepresentational art) can be fantastic here, too. (New vocabulary words!) This will help alleviate stress for those students who might be insecure about their drawing skills.

Once everyone starts working, you might get questions about how to draw this or that. The way I handle this is to “talk them through it” without solving it for them. Ask them questions about the thing they want to draw or represent, leading them to create something themselves. Depending on your students, you might make little pieces of scratch paper available, so they can work out some rough sketches before committing their idea to their banner. This kind of thinking and decision making is a vital part of any meaningful art experience and distinguishes it from merely being a “craft project”.

Once completed, the streamers can be suspended from a line stretched across your room or will even look spectacular if they are taped or stapled to the walls. If you don’t have space in your room for display, perhaps you might consider hanging them in the front office, library, hallway, or cafeteria? If time permits, invite students to describe their streamer decorations and talk about why they did what they did with the class. (Oral language!) Or perhaps you might have them write about their streamer decorations and their decision making during the creative process. (Written language!) If you really want to try something fun, consider introducing the idea of a “critique”. This teaches students how to be careful observers, and how to speak respectfully to each other about the work that has been done. A thoughtful critique also shows students how many other creative solutions there are to any given art problem. When the time comes for winter break, the streamers can be simply rolled up and held with a rubber band or paperclips to be taken home for family and friends to enjoy.

For more ready-to-use art lesson plans, consider registering for my affordable, convenient, self-paced classes here.