Archives for category: shape and form

IMG_2599Here’s a quick little art experience you might like to try with your students that will help them explore the differences between positive and negative shapes and space.

All you need are 3 sheets of white paper per student — even copy paper will do — some small pieces of scratch paper, pencils, and cotton balls or tissue.

To begin, ask your students to cut a shape out of their first sheet of paper. Depending on the age and ability levels of your students, the shapes can range from simple, free-form organic shapes, to something much more complex. You will want to have them cut out their shape so that when they are finished, they are left with two things: the shape itself that they cut out, and the outside edge of paper around what they cut out.

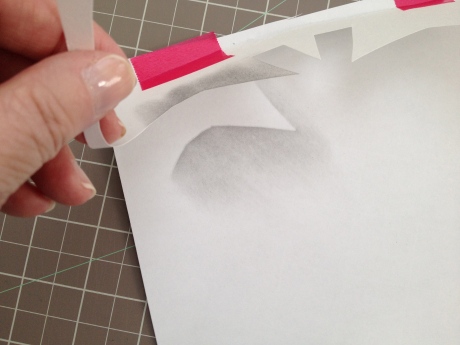
Have them place the paper that they have left over from cutting out their shape, on top of their second piece of paper. (You might want to have them tape the top and bottom pieces of paper together to prevent movement.) Using a pencil, have them rub a patch of lead onto a piece of scratch paper. Using a cotton ball or a tissue, have them pick up some of that pencil lead and begin to rub it from the outside edge of the paper toward the center open space left by the shape they cut out.

IMG_2601

Continue this process of rubbing pencil lead from the outside edge in toward the center, until they have filled the center with pencil shading. Carefully separate the two sheets of paper. What they are left with is a shaded image of their shape. This shaded shape is the “positive” image. If you were to peek under an edge while they worked, it would look like this:

IMG_2602

Next, ask your students to carefully position the actual shape they cut out on top of their third sheet of paper. (You might consider having your students place one or two tape loops underneath their shape to keep it from moving around.) Using the same pencil lead and cotton ball or tissue, this time you are going to ask your students to rub from the shape itself onto the paper below.

IMG_2603

Have them continue rubbing from their shape onto the paper underneath it until they have rubbed all the way around. Ask them to carefully separate the two pieces of paper, set their actual cut out shape aside, and what they will be left with is an image of their shape determined by the shading around the outside of it. This is the “negative” image of their shape. If you were to peek underneath their shape while they were working, it would look like this:

IMG_2604

Try this yourself first so you can see how easy and fun it is to do. Kids are always delighted by this experience because the results seem so magical!

Looking for more art lessons like this one to incorporate into your classroom curriculum? Check out my affordable, convenient, and self-paced Professional Development course offerings through Fresno Pacific University here. This particular lesson is part of my class called Drawing Magic.

OLYMPUS DIGITAL CAMERA

I love this time of year! This season of magnificent color presents an exciting opportunity for students to notice and record what they observe happening around them. If your students aren’t already keeping “art journals”, I suggest that now is the time to have them start! You can read my earlier posts about the ease of setting up and using art journals here, here, and here. There’s also a post here about observational drawing that you might find helpful.

My proposal is simple. Have your students observe leaves, one at a time — over time — as they change colors throughout the fall. While many different approaches are possible, I would suggest that you begin by simply having them each select one leaf to bring into the classroom. For this first observation, I would encourage you to suggest that they look for leaves that are primarily green. You might say something like, “We’re going to go outside (to some specific area) and spend just a few minutes while you each find one green leaf to bring back inside our classroom.” This sets a few basic parameters as well as your expectations: A) we will all be staying in the same area together, and B) we will be spending a very short amount of time doing this.

Once back inside, the process of carefully observing their leaves can begin. (Having each student set his or her leaf on a small, pre-cut square of black or white construction paper will help simplify the background, and will make each leaf seem “special” as if on display.) I would not have any pencils or paper out at this time to help focus their attention on their leaves only, and on LOOKING. Oral language and sharing would be great here… what do they see? Students can share their observations with a neighbor. Perhaps you could make a list of class observations. Vocabulary words like line, form, shape, color, and texture can be introduced or reinforced.

When it’s time to draw, journals/paper, pencils, erasers, color pencils, crayons and anything else you might make available can be distributed and the drawing can begin. You might encourage your students to draw one large image, or perhaps you might encourage them to draw several smaller images — or “studies” — of the same leaf from different angles. (This is great for those students who always finish at light speed! Ask them to move their leaf and take another look at it from this different angle.) Most of all, encourage them to take their time, to slow down, and to really look at what makes their particular leaf special and unique. The trick to observational drawing is to actually draw what you see in front of you, not what you THINK you see. Every child in your class has seen a leaf, and generally knows what leaves look like, but today you want them to do the best drawing they can of the particular leaf that is right in front of them.

If you have the time and the inclination, you might attach a writing component to this activity, having students describe what they see, or perhaps how they felt looking at their leaf and trying to draw it, or maybe even compose a poem about it. This writing could be as structured or as “free form” as you want it to be. The writing and drawings can be shared aloud with a partner and/or with the class. Another idea is to have everyone leave their journal open on their desk (or their paper out) and everyone moves around the room doing a “journal walk” or “gallery walk” to enjoy everyone’s work. (If this type of activity is new for your students, you might need to spend some time talking about how important it is to value all efforts, and to stick to constructive comments.)

As you notice the leaves changing colors over the next several days or weeks, explore this same process all over again, but this time you will encourage your students to select leaves that are say, yellow. Maybe a few days or weeks after that, everyone will select red leaves. Reinforce for your students how amazing it is that while you are returning to the same area over and over again for leaves, they have changed color dramatically.

This simple, multi-step journaling practice can be repeated using a multitude of subjects, some of which include growing plants, trees budding out in the spring, or something rotting like a small piece of fruit — kids LOVE the gross-out factor of this last one! Once kids get the hang of what you expect from them out of this process, this type of drawing can even be something that your students can do independently like at a station or center, or perhaps when other work has been finished. When practiced frequently, observational drawing is so much more than an art exercise for students, but rather it becomes a thoughtful, meaningful way of viewing, thinking about, and of understanding their world.

IMG_1816In northern California where I live, May has arrived with an explosion of flowers. If this is true where you are too, why not take your students outside to enjoy some of nature’s splendor? Help your children really slow down and see the spectacular colors, the interesting textures, and the wide variety of shapes that spring flowers have to offer.

IMG_1819After some careful observation, consider giving them about 15 minutes or so to carefully draw what they see. Have them focus in on one small area. If your students already have sketchbooks, that’s great! If not, a sheet of plain while copy paper held on top of a book for support will work just fine. Don’t make it complicated… just don’t miss this opportunity to teach your students the simple joy of slowing down and really seeing the beauty of the world around them.

IMG_1820If winter-like weather is still in full swing where you live, bring a small potted flower or two into your classroom for your children to observe and draw. This small bit of color and cheer will help you all be patient as you look forward to warmer weather that should certainly arrive soon.

OLYMPUS DIGITAL CAMERALooking for a unique and creative way to celebrate Earth Day with your students this year? Allow me to suggest Earth Day hats! (Pictured above is a basic, undecorated scored paper hat shown from the side/back.)

The idea here is to have each student in your class create a hat, and then decorate it using Earth Day as the theme. While the basic hat shapes will be the same, each child’s surface decoration will be distinct and unique, making each hat a personal statement about how that child feels about protecting and celebrating the earth.

You will need one sheet of 18X24 inch construction paper for each child in your class — color choice is up to you. You will also need a stapler, any type of glue, scissors, and lots and lots of discard materials for the students to choose from. This could be anything from a scrap paper box, to things like, ribbon, buttons, cotton balls, tooth picks, fabric, feathers, tissue paper, brads, yarn, pipe cleaners, glitter, etc. This art experience is the perfect time to use up a variety of random things you have on hand, and to recycle old things into something fresh, fun, and new!

To make a basic hat, just make one simple scored line in a half circle shape on the long side of a sheet of 18X24 inch construction paper. (See diagram below.) If you’ve never scored paper before, you will simply drag the pointy end of a pair of scissors — or even the tip of a paper clip that’s been bent open will do — gently across the paper. This “scored” line that you’ve just created will allow you to then fold the paper along this curved line. (Scoring as a technique is amazing! Once you start exploring it, you’ll be hooked!) Attach points A and B together with a staple, and you’re done. Super simple! (In the photo at the top of this post, you can see this stapled connection point at the back of the hat.) If you’re working with very young students, it might be a good idea to have the hats made ahead of time for them so that they are all ready to be decorated. Scoring takes a little bit of practice so as not to cut through the paper while you’re doing it, but after a few tries, you will learn what amount of pressure is just right.

IMG_1738

If Earth Day is going to be your theme for hat decoration, it might be a good idea to spend some time talking with your students about all of the different ways they could decorate their hats to show how they feel about protecting and celebrating the earth. They could cut out letters to include words on their hats, they could cut out, or tear out, and create symbols to place on their hats (think earth, sun, clouds, water, plants), they could add fun, three dimensional things to their hats such as paper streamers, ribbons, and more. (I would strongly suggest that you not use drawing materials such as markers, crayons, or pencils for hat decoration, as drawings tend to lack the excitement and involvement that other types of surface decoration provide.) Perhaps this brainstorming could be captured as a list that the students could refer back to while they work?

By this time, your students will be highly motivated to get started creating their hat masterpieces, so there is little left to do beyond getting their hats and materials distributed to them. They will have a blast making something that is such a personal statement, and the fact that they will be able to wear them when they’re complete just sweetens the deal. (I’m envisioning a photo op in here somewhere!) Have fun with this, and I’d love to hear how it goes if you decide to try it! (Pictured below is a basic, undecorated scored paper hat from the front.)

OLYMPUS DIGITAL CAMERA

IMG_1468Here’s a lesson idea that will create a fun, fresh, whimsical look for  your classroom or school this January. Consider the exciting possibility of having your students make REALLY BIG snow people and/or animals! There are lots of options for this lesson, from having your students make life-size snow people that they decorate to look like themselves, to having them create large snow people that they decorate to represent characters from literature or historical figures, or perhaps instead they make snow animals that represent real animals you might be studying in your classroom. You decide how “connected” to your curriculum you want this to be. No matter which way you go, you’re sure to get a wonderful cast of winter characters!

Materials are simple: white butcher paper, construction paper in a variety of colors, paper scraps, fabric and other miscellaneous materials you might have on hand such as cotton, glitter, twigs, wrapping paper, glue, tape, and scissors.

You will have pre-determined the “theme” of the snow people/animals for your class, so talk to your students about what they will be doing. (Obviously, everyone should be working on the same theme, i.e. all will be making themselves, or all will be making a favorite character from literature, etc.)

Talk with them about why tearing out the circles for their snow people (or animals) is a better approach than cutting out the circles. (Tearing produces a more “snow-like” texture.) Have them tear large ball-like shapes out of white butcher paper. To help ensure that all finished snow people are about the same size, it might be a good idea to have large, pre-cut squares to give to the children — each child getting a large, medium, and a small square. If they carefully tear so that they “touch” each side (or edge) of their square, their finished snow people (or animals) should end up being similarly sized. (They don’t have to be identical to each other, just similar. You don’t want one 6 inch tall snow person, and one that is 3 feet tall.) It would be a great idea to have several extra large, medium, and small squares cut out, just in case someone needs to start again. (Someone probably will… and that’s ok.)

Let me stop here and say that for some of you it might be tempting to make one of these yourself and then show it as a sample to your students. There is no need for you to do that. I would suggest instead, demonstrate what careful paper tearing looks like by beginning to tear a large circle out of one of the pre-cut squares like you will be asking them to do. Show them how to “touch” each side (or edge) of their square, using their whole paper. This is all they need to see — they DO NOT need to see a finished snow person or animal in order to make one themselves.

Once the basic snow people or animals have been established, have them cut or tear all of the features they want to use such as eyes, nose, mouth, glasses, braces, mustaches, etc. that will enhance the snow person’s identity. These should be glued to the snow person’s head. After the three graduated body parts have been glued or taped together, your students might want to add special decorations like a hat or scarf. Depending on the “theme” you’ve chosen, consider if any other “accessories” or items need to be created and added to further determine the snow person’s identity. Any “extra” materials you’ve gathered for the children to use will come in handy here, such as fabric, glitter, cotton, twigs, etc.

These large creations would look fantastic in your classroom, but don’t let a lack of display space stop you. Because they are so large, they make a wonderful display along a hallway, in the office, library, or cafeteria. If you’ve chosen a theme that connects with an area of your curriculum, perhaps a bit of writing by each student could be included about the character, historical figure or animal represented.

I’d love to see your display if you have your students make these. Please email photos to JGomasFaison@gmail.com with “Big Snow People” in the subject line. Enjoy!

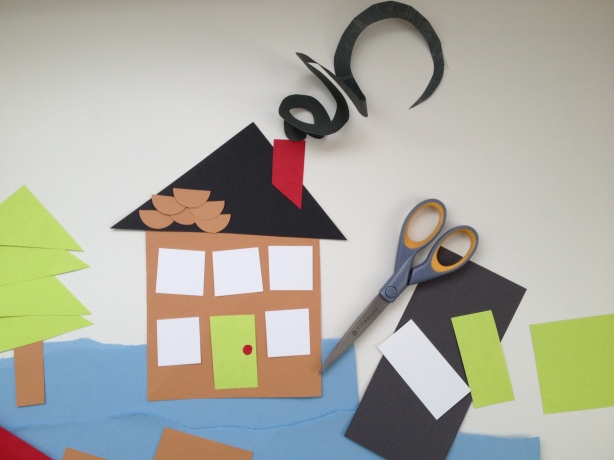
IMG_1446Just in time for the new year, here’s a lesson idea that’s sure to delight you and your students! Called “Winter Village”, this lesson will create a wonderful group display while it reinforces the concept of geometric shapes.

The materials required are simple: construction paper in a variety of colors (whole sheets and scraps both work well), any drawing tools you have on hand (crayons, markers, color pencils), tape and/or glue sticks, and scissors.

Talk with your students about geometric shapes and tell them that they are each going to “build” their own home, cabin, or castle using just these shapes. Their buildings may be realistic or imaginary, but they must use geometric shapes to construct them. Consider having your students tape or glue their shapes down onto a background sheet of construction paper, which will enable their creations to “grow” with as many shapes as they want to use.

Together you can brainstorm a list of architectural details that make a building distinct, like windows, doors, shingles, addresses, steps, and shutters, as well as all of the different materials buildings can be made of such as bricks, cement, wood, metal, etc. Encourage your students to add these kinds of “textures” and details to their own dwellings using cut or torn paper, or any of the drawing tools you have supplied. For some extra fun, have each child place one of their school photos in one of the windows of their building!

An exciting way to display these once they are finished, is to cut away any background paper that is still showing, and then place all of their little houses on a “winter scene/landscape” bulletin board, thus creating a little winter village made up of all of your students’ buildings. They may want to add a few trees, street signs, and lamp posts around town to complete their village scene. A little torn paper “snow” on the roof tops would look fantastic too.

If you decide to create a winter village with your students, I’d love to see it! Please email photos to: JGomasFaison@gmail.com and please put “Winter Village” in the subject line.

Like the song says, “It’s the most wonderful time of the year!”. In so many ways, this wonderful season is especially beautiful, and I encourage you to take a few moments when you can, just to notice it. Really look around you right now. This time of year is heavy on the sparkle and glitter, the warm glow of candles, the riot of color, pattern, and texture. Savor it. Let your eyes just drink it all in. And while you’re at it, why not help your children and students notice this bounty of beauty as well? Amid all the hustle and bustle, show the children in your life how easy — and rewarding — it can be to just stop for a moment, take notice, and enjoy.

In the classroom, this type of “visual study” could be the jumping off point for some very meaningful writing, whether it be reflecting on past holidays, thinking about wishes for the future, or writing about what’s going on right now. Maybe it could be a piece of descriptive writing, filled with as many adjectives and details as possible. Observing something thoughtfully, and then drawing it as carefully and as accurately as possible, is also another worthwhile experience. (This is especially good for quieting down energized little ones while helping improve their focus too.)

Teachers: don’t forget that winter is the perfect time to sign up for professional development courses! The art classes I teach are affordable and convenient — and you have up to one year to finish your course work! Picture yourself… hot cocoa in hand, with warm slippers on your feet, earning 3 units of graduate credit in the cozy comfort of your own home… Click here to find out more.  🙂

While counting your blessings this Thanksgiving, my hope is that you will also take time to notice the many little artistic miracles that surround you, such as vibrant color, rich textures, interesting shapes and forms. When you begin to pay attention, life can truly be a feast for the senses each and every day.

Happy Thanksgiving!