Archives for category: Professional Development

IMG_1763Congratulations to Ann G. of Sterling Heights, MI!

Ann is the winner of the first of four fabulous Art Kits I’m giving away over the course of a year. Her registration in my class ART 902: The Magic of Paper in April provided her with the winning entry “ticket”.

IMG_2016

Click here to read more about the art kit, and about how YOU can be entered to win the kit pictured at the top of this post. The next winner will be drawn on October 1, 2013. Hint: One way to be entered into this drawing is to take one or more of my art classes offered through Fresno Pacific University’s Center for Professional Development, just like Ann did. So… if you’re still thinking about earning some professional development credits this summer, it’s not too late, and you can register here. My classes are affordable, convenient, and self-paced. (No art experience required or necessary.)

Hope to see you in class this summer!

Advertisement

IMG_1996I’m thinking a lot today about the most important mentor I’ve had for my art and teaching careers. That mentor was my Dad, Ralph Gomas. Today he would have been 78 years old, so of course I’m thinking of him even more than usual on his birthday.

Without his example — his and my mom’s actually, because she’s very creative in her own right  — I don’t think I would have been interested in pursuing art as a career. In fact art and design were such an integral part of my life growing up, I didn’t really even consider them career options at first… they were so foundational. Because of this strong artistic foundation, becoming a graphic designer was a natural fit for me and I loved it. I was already working in the industry when we began to move away from using darkrooms, typesetters, and waxers, to working completely on the computer. It was liberating and frustrating all at once. (I still miss wielding an x-acto knife from time to time.)

Then life changed and I went back to school to earn my teaching credential. It took me by surprise how much I loved being in the classroom. It really is a performance of sorts, and I’d always loved doing that, so I shouldn’t have been shocked. My Dad’s help as I took the helm of a first grade classroom, and then years later, a continuation high school art room, was invaluable. (I literally don’t think I could have survived the start of that high school teaching assignment without his constant help and advice!) Next, I earned my Master’s Degree which enabled me to begin working side-by-side with my Dad teaching the Professional Development art courses he’d written for Fresno Pacific University’s Center for Professional Development. We spent hours together with him talking me through his thought process while reviewing the work of countless students from all over the country, and the world. This was mentoring at it’s best. Then we worked together in the same room but on separate computers reviewing student work. It was reassuring to know I could ask his opinion any time I needed to if I had a question about something a student had submitted.

Though he’s been gone for a little more than eight years now, his skilled mentoring still guides me to this day. He’s not sitting at the computer next to me, but I feel he’s always close in my heart when I really need him.

Have you had a special mentor while following your career path? Do they know how much they’ve helped and influenced you? Perhaps you yourself have had the privilege of being a mentor to someone. It can be an awesome responsibility as well as a terrific way to “pay it forward”.

IMG_1963In less than one month — on July 1st, 2013 — I will draw a name from this box to find out who gets the first of four fabulous art kits that I’m giving away over the course of a year. Is your name already in here? Will YOU be the lucky winner? Click here to read more about this terrific giveaway valued at more than $100, and learn how easy it is to be entered to win.

Hint: Registering for one of my Professional Development art courses offered through Fresno Pacific University will get your name entered into this drawing 6 times! Summer is a great time to earn some affordable PD credits from the comfort of your own home. Learn more here.

IMG_1809With graduation season upon us, and another school year drawing to a close, this is a great time to help students think about where they’ve been, where they are, and where they’re headed. The “My Life” pop-up book is a small, three-section book that invites students to think about significant events/people/places from their past and present, and to imagine their future. Breaking the book down into these three main time-frames will enable your students to more easily focus on significant details without being overwhelmed.

Here’s what you’ll need: Sheets of 9×12 inch construction paper in a variety of colors, construction paper scraps, scissors, tape, staples, glue, and markers. You might also want to include other materials such as brads, cotton, yarn, buttons, ribbon, string, fabric scraps, hole punches, and construction paper sheets larger than 9×12.

Each child will ultimately need 6 sheets of construction paper — 1 sheet for each of the three pop-up sections, and 1 “backing sheet” for each section. Because this book will consist of 3 separate sections, students may begin on any section they choose — past, present, or future. After all sections are complete, the book may be assembled in the correct order.

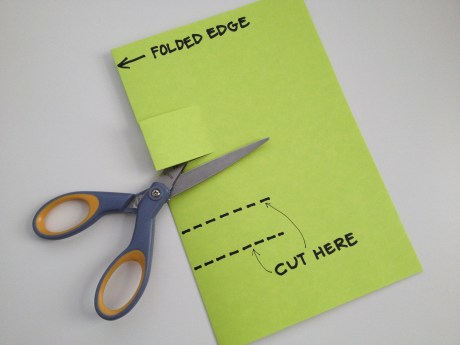
Begin by demonstrating how to make a simple pop-up tab. Fold one sheet of 9×12 inch construction paper in half, and make two parallel cuts along the folded edge for each pop-up tab you want to have, like this:

IMG_1790

After cutting, open your paper, and push the tabs you just cut to the “inside” of your folded paper. Close the folded paper with your tabs inside. When you open the folded paper back up, your tabs should stand up like this:

IMG_1791

Elements that will pop-up when the book is opened will be attached to the front of these “tabs”. Encourage your students to get fully involved in the surface decoration of each section of their book using construction paper scraps and any other materials that you have provided. For example, if their own birth is the significant event from their past that they want to represent, perhaps they will have a small crib as one pop-up element, with another being a large cut-out of the numbers for the year they were born. The “background” of the scene could be decorated like a wall in the baby’s room, and the “foreground” area decorated like the “floor” of that room. In other words, encourage the creation of entire settings or scenes to fully represent their significant event/place/person, etc.

IMG_1797

Depending on the age and ability levels of your students, a bit of writing for each section can be included to add depth and description to what they’ve created visually.

After a section is complete, a second sheet of construction paper should be folded in half and attached to the back of the section sheet like this:

IMG_1802

Once all three sections — and their backing sheets — are finished, the sections can be connected together using staples, double-sided tape, or glue. (Hint: you’ll need to be very patient if you use glue!) If you desire, you can have the students decorate the “cover” sheet of their book. For a more finished look, you can wrap a larger sheet of construction paper around the outside of all three sections of the book, and after attaching it, trim off any excess. (A 9×12 sheet won’t be large enough once you’ve connected all three sections of the book together.) This then can be decorated as the cover.

Not only will you learn a great deal about your students during this process, but they will love sharing the highlights of their lives with you and with their friends.

Interested in more fun art ideas like this one? Check out the affordable, self-paced, and convenient professional development art classes I teach through Fresno Pacific University here!

IMG_1763I’m so excited to introduce something brand new on my blog! I’m calling them “Art Kits”, and it’s super easy to be entered into a drawing to win one.

Each Art Kit is valued at over $100.00, and includes everything you see in the photo above, as well as an easy to follow, step-by-step lesson plan and 50 sheets of white drawing paper — And it can be YOURS for FREE!

I’ll be giving away a kit exactly like the one you see pictured above, every three months for the next year — that’s four kits in all! This is called Art Kit #1: Observational Drawing: Sea Shells. In addition to all of the fun stuff you see in the photo, you’ll also get a step-by-step lesson plan that you can use in your classroom immediately. (No art experience on your part is required or necessary.)

Students of all ages will love looking through their magnifying glasses to see a detailed view of any one of the interesting shells included. The lesson plan will walk you through an easy to present lesson that will encourage your students to carefully observe a shell and then create an original drawing of what they see. Soft lead pencils and special erasers will help them get their drawings “just right”. They will be thrilled to then add color with chalk using the ordinary blending tools of cotton balls and Q-tips! In addition to the excitement of creating art, you’ll see lots of valuable curriculum connection possibilities for your students in science, math, and language arts.

Here’s how to win!

1) Register for one or more of the affordable, convenient, self-paced Professional Development Art Classes that I teach through Fresno Pacific University here. Each registration will earn you 6 Entries into the Art Kit drawing.

2) Refer a colleague who registers for one or more of my courses and you’ll earn another 6 Entries into the Art Kit drawing. (I must be notified via email of the name of the person who made the referral in order for them to be given their 6 entries for that referral.)

3) Comments on my blog or Facebook page will each earn 1 entry into the Art Kit drawing. (Only one comment per person, per day will count towards entry into the drawing.)

Registrations, referrals, and comments will earn entry into the Art Kit drawings based on the following time table:

April-May-June: Winner’s name drawn on July 1, 2013

July-August-September: Winner’s name drawn on October 1, 2013

October-Nov-Dec: Winner’s name drawn on January 1, 2014

January-February-March: Winner’s name drawn on April 1, 2014

As you can see above, I’m breaking the year into quarters with April-May-June being the first block of time for the first Art Kit drawing. So for example, all course registrations received, colleagues referred & registered, and comments made from April 1, 2013 until June 30, 2013 will be included, and I will draw the winning name on July 1, 2013. Then the process begins again for July-August-September and so on, until the fourth and final Art Kit winner is drawn on April 1, 2014.

So what are you waiting for? Head on over to Fresno Pacific University and register for one of my art classes! Then get a friend or colleague to do the same! While you’re on a roll, comment on any of my blog posts or head on over to my Facebook page and get typing! You can’t win one of these great kits if you don’t enter… so get going and get excited!

(If you’d like to purchase Art Kit #1: Observational Drawing: Sea Shells, please contact me via email for information at JGomasFaison@gmail.com)

IMG_0521Spring Break! That glorious time is upon us. As you look forward to spending some much deserved time relaxing and recharging… I have a suggestion for you.

What about getting a jump start on some Professional Development during your break?

Each one of my 3 unit Professional Development art classes is affordable, convenient, and self-paced. You can register any time — day or night — and within 48 hours you will have your materials. This means you can get started right away on some really fun art lessons that you’ll be able to work on at your leisure, whenever you feel like it. The lessons that make up each class are immediately teachable in your own classroom, so you’ll return to school after break with some fantastic art lessons that will be easy to integrate into the curriculum you’re already planning to teach.

Click here for details, syllabi, or to register. I can’t wait to “see” you in class!

DSC01110As a teacher of professional development art courses for the past 17 years, I’ve noticed one consistent truth: teachers are reluctant to teach art because they are afraid. Afraid that to effectively teach art, they must “perform” artistically in some way for their students. They repeatedly tell me things like, “I can’t draw” and “I’m not an artist”. My message to them is twofold. First of all, experience has shown me that everyone is creative to some degree — we all just have different levels of art experience and exposure. Secondly, and perhaps most importantly, a teacher doesn’t need to be a trained artist, or to be able to draw, in order to present successful, meaningful, and powerful art lessons in their classroom. In fact, I would argue that the most important thing a teacher needs to be when teaching art, is what I would call a “monitor/motivator”, and one of the most profound phrases in the motivator’s toolkit is, “take another look”.

Just as adults can be intimidated by art, so too are the students we teach. It’s no surprise that the higher up in grade level one looks, the more fear and trepidation one will see in the students. This is where the power of the “monitor/motivator” role comes in. By closely monitoring your students as they work on any given art experience, you will be able to support and motivate them as needed, helping to build their confidence. Actively move around the room offering constructive, encouraging words and comments while you closely look at what they are working to create. When students ask for help and want you to solve an art problem for them, resist the urge to do so and suggest that they “take another look”. Ask questions that will encourage their thinking and analysis of their own work, and of the problem at hand. This is critical thinking made manifest.

Because of a limited exposure to art among other things, students often think they are finished with an art making experience long before they really are. This is the crucial point where you can acknowledge what they’ve already accomplished by saying something like, “That’s a really great start!” and then offer the empowering questions, “What else can you do here? Take another look… what else can you explore?” This suggestion to “take another look” lets the student know that there is still more to see and to do, and that your expectation is that they will continue to search for it. You are challenging them to push past what might have been a quick, simple, and safe solution on their part, while letting them know that you have faith in their ability to go beyond it. As you consistently monitor and motivate your students during art experiences, you will see your students look to you for answers less and less, as they begin to trust themselves more and more.

As Maria Montessori once observed, “The children are now working as if I did not exist.” Helping your students develop into inquisitive, self-directed, life-long learners is possible, and connecting meaningful, authentic art experiences to your curriculum can foster this development. Please click here to see the affordable, convenient, and self-paced professional development art courses I teach through Fresno Pacific University. (* No art experience needed or required!)

IMG_1679For many of us, creating something is much easier with some sort of visual reference. Whether we’re making a drawing, a painting, or a sculpture, having something in front of us to look at helps us get the details right. It helps us with things like proportion, texture, pattern, and color. Here are a few easy suggestions that will help you establish a valuable set of image files that your students can use again and again when they need a visual reference. Why the need for such files you ask? Well, if one is drawing a rose, for example, it’s not too difficult to simply bring one into the classroom. The same holds true for any number of fruits, vegetables, and small objects. But what if your students are trying to draw or sculpt say, an elephant, or a particular type of fish? Not so easy. Enter the image file.

My suggestion to you is that you create a series of files filled with photographs that your students can reference as needed. I want to be very specific here about saying that your images files should contain only photographs — not drawings or paintings of things. The problem with using drawings or paintings of things as a reference is that someone else has already made all of the decisions about color, line, texture, etc. When you have your students work from photographs, they must decide how to interpret the “reality” of that photo into their work. This involves a tremendous amount of observation and problem solving skills that are essential to student growth and learning.

For my own classroom files, I purchased some very inexpensive books of photographs of whatever I was looking for. (Yard sales can be a fantastic source!) Because having an entire classroom of students share one book is not practical, I simply tore the pages out of the books I collected. (As a lover of books, this was kind of hard to do at first, but I persevered and it worked so well, I never looked back.) I used hanging file folders to store these now single sheets of photos, and labeled them by category such as, insects, fish, mammals, reptiles, birds, flowers, etc. (Often these photos also have an accompanying paragraph about whatever is in the photo, which I find to be a real bonus as far as student learning is concerned.) Once these files are established, it’s simply a matter of pulling them out when you need them. So for example, if you’re working on an art project that involves reptiles, you simply bring out the reptile file and you’re all set. If only one topic is being used, I simply spread out that file’s contents on a table for students to peruse. If we’re using multiple subjects, I place the files we’re using in a small hanging file container someplace where the students can look through them.

When I initially set up my image files, the internet was not something we had access to in classrooms. And while it might be tempting to let students search for images on the computer, I would advise against it. In my experience, students will make a selection from this type of photo file within a minute or two of looking over the photographs. How long do you imagine they might look on the internet…?

Trust me that after only a small initial investment of time and money on your part, you will end up with files that will serve you well for years. You won’t be able to imagine how you ever lived without them!

Need other ideas for great art experiences YOU can do in your classroom or with your homeschooled kids? Check out my affordable and convenient professional development courses here. You can register at any time for my distance learning classes, and best of all, you complete them on your schedule. I hope to “see” you in class soon!

IMG_1659What better way to show we love the earth, than by creating some gorgeous Valentine’s Day inspired art work that encourages recycling as well?! Enter “Giant Stuffed Paper Hearts”.

The materials for this spectacular art experience are outrageously simple. You will need butcher paper, “stuffing”, a stapler, any sort of decorative materials, glue, and string or fishing line. (If you have access to butcher paper in “Valentine” colors like pink, red, and purple, that’s great. If not, white and even black will work just as well.)

The idea here is that you are going to have your students cut giant — and I do mean giant — hearts out of butcher paper, decorate them, stuff them, and then hang them from the ceiling. (If your school won’t allow you to hang anything, these could just as easily be stapled to a wall where they will still look puffy and three dimensional.)

While you could use anything for the stuffing of the heart, this experience presents a perfect opportunity to talk about things like recycling, and campus beautification. If you are so inclined, you and your students might walk around the school yard collecting trash and bits of paper. (Gloves might be a good idea here.) Or maybe you could use paper from your own classroom that would normally be thrown in the trash? Newspapers collected from home work well here too. The point is, this art experience is tangible evidence that trash can be transformed again into something else — in this case, into something beautiful.

When cutting out their paper hearts, each child will need two hearts exactly alike, so you can show them how putting two pieces of paper together and cutting them out at the same time will accomplish this. (An alternative to this would be to have them cut out one giant heart, then trace that on to their second piece of butcher paper and then cut that one out.) Depending on how involved you want them to get, and on how you plan to display them, you can instruct your students to decorate only one side of one of their hearts, or one side of each of their hearts. I would really let them go wild here with lots and lots of different decorative materials. Things like paint, construction paper, tissue paper, crepe paper, glitter, lace, ribbons, yarn, buttons, cotton, etc. would all be super fun for the kids to work with. (Because the hearts are large, I would probably not put out any drawing tools for this one, as any drawing the children might do would tend to be small, and the surface decoration for these should really be bold and large.)

Once all surface decorations are finished and have been allowed to dry, place the two hearts together and begin stapling around the edge to connect them. (Staple at least one inch or so in from the edge.) Remember that if you had students decorate two sides, make sure each of those decorated sides face out, and that the plain sides are on the “inside”. After you’ve stapled about half way around the hearts, you may begin stuffing the heart with very loosely crumpled paper or trash. You want to keep these hearts very light, so there’s no need to stuff them full of tightly wadded paper. Use just enough lightly crumpled paper to “fill out” the heart and give it a puffy shape. Finish stapling the remainder of the edge to close the heart, and you’re done. The resulting hearts should be very light, so it will be easy to hang them from your ceiling if you choose to do so. Don’t worry about hanging them at the same height, because hanging them at different heights adds to the fun. You will be amazed at the magnificent display these create and your students will love them!

Share the love! If you decide to do this art experience with your students, I’d love to see the results. Email photos to me at JGomasFaison@gmail.com and with your permission I might even share some of your photos on this blog. Happy heart-making!

IMG_1435As we all start this bright new year full of fresh hopes and dreams, my wish for you is that 2013 is a year filled with art. Whether you make art yourself, teach art to your students, or appreciate the art of others, make the time to enjoy the pleasures that an art-filled life has to offer. I promise you won’t be disappointed. Happy New Year!

If you’d like to incorporate some art into your classroom but don’t know where to begin, check out the classes I offer here through Fresno Pacific University. My distance learning classes are affordable, convenient, and flexible.